准备内容:
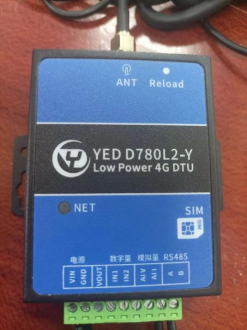
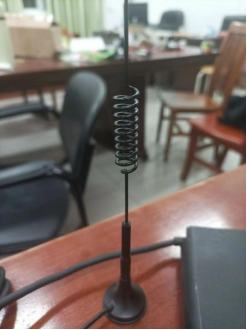
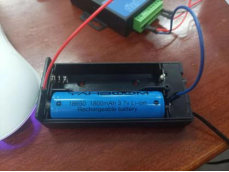
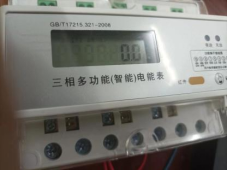
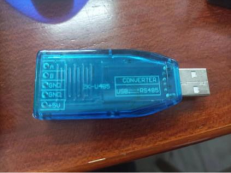
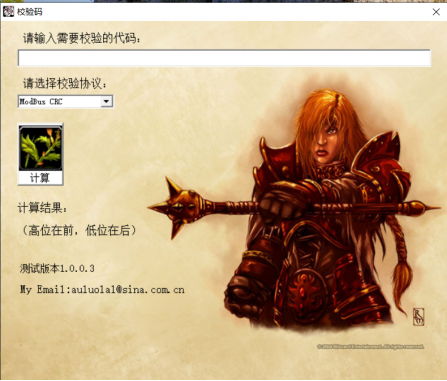
YED D780L2-Y、天线、3.3~4.2V电源、RS485转USB模块、三相多功能电能表、格西烽火串口助手、CRC校验计算工具
软件下载:链接:https://pan.baidu.com/s/1WAFk-bLEydd3m0iQw6D4DA
提取码:wb02
1.配置流程
1.1注册账号
1.2添加配设备
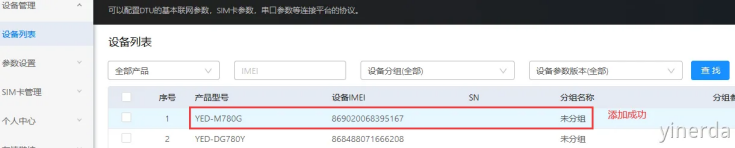
设备管理->设备列表->添加设备。可以用微信扫码设备IMEI后添加(不用填写SN),如果添加成功,能看到产品型号和设备IMEI。产品型号后面创建分组需要使用。
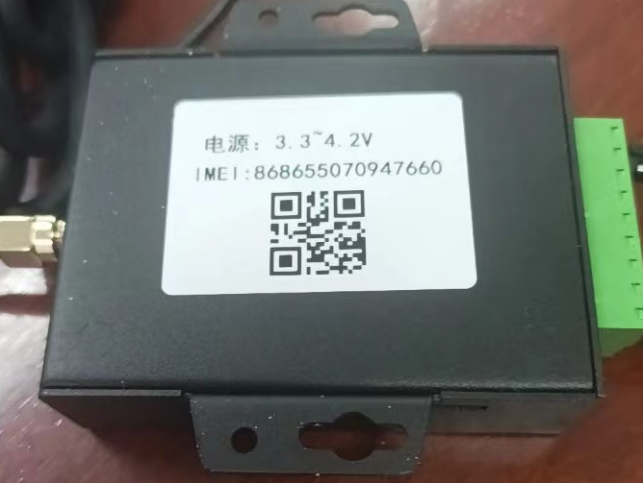
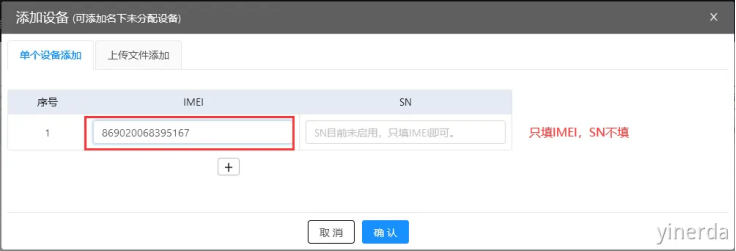 就是设备背后的这个码,微信扫码后可复制粘贴
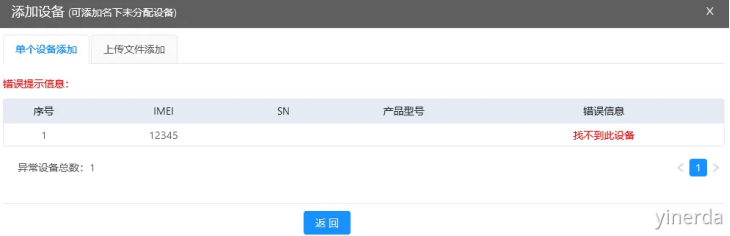
如果提示:“找不到此设备”表示设备没授权,核查一下设备IMEI是否输入正确,如果正确需要联系销售授权后再添加。
1.3创建分组
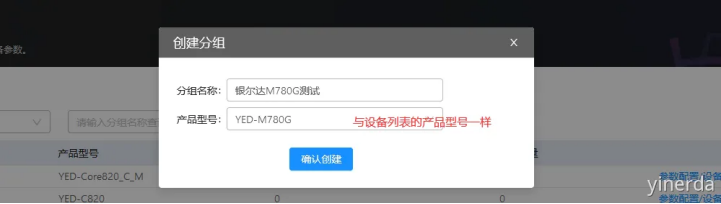
参数设置->分组管理->创建分组。分组名称自定义,分组产品型号必须和设备列表显示的“产品型号”一样。
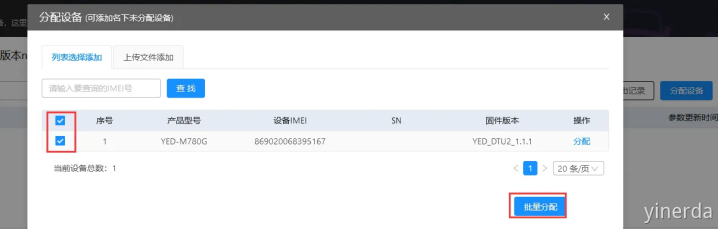
1.4分组添加设备
参数设置->分组管理->设备列表->分配设备。在分组里面添加设备,这些设备的参数就会和分组一样。可以点击查找或者F5刷新页面数据。如果在分配设备的时候,找不到你添加的设备,一般就是分组型号和设备型号不一样导致。
1.5配置参数
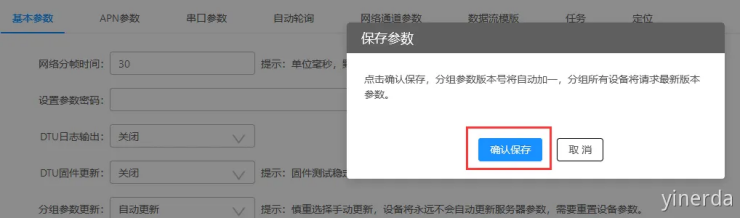
参数设置->分组管理->参数配置。进入参数配置,当配置好参数后,点击“保存参数”,确认保存后,就修改了参数。新创建的分组没有参数,需要点击“保存参数”后才会保存新参数,修改产生后只需要点击一次保存即可。

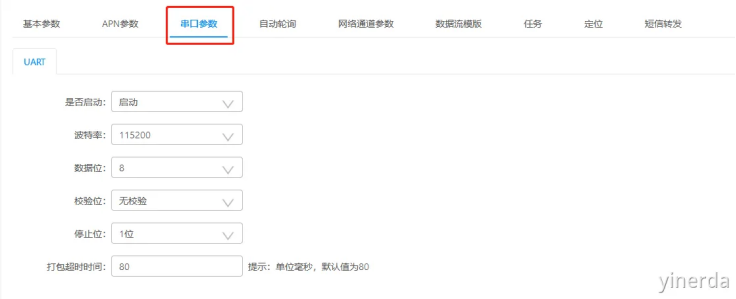
注意串口参数默认是关闭的,需要打开串口才能通讯。
参数修改后,点击一次保存,保存参数。
1.6设备更新参数
确认设备能正常联网后(NET LED 500ms闪烁),断电重启设备,设备自动更新参数,重启设备等20-30秒刷新网页。
没更新参数的时候:

断电重启设备更新后的状态:

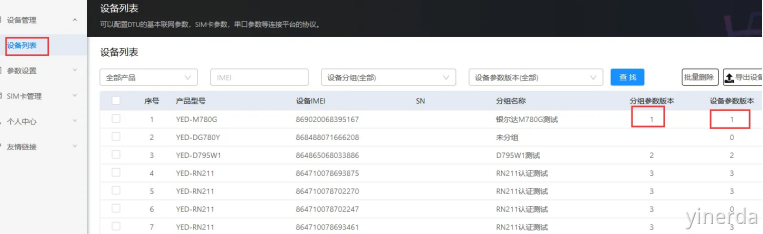
1.7设备信息查询
设备管理->设备列表。可以通过分组参数版本=设备参数版本,确认设备是否更新了参数
2.MQTT配置
DTU配置平台:https://dtu.yinerda.com
DTU测试平台:http://test.yinerda.com
2.1必要条件
1.参考第一章,完成添加设备,创建分组,分组里面分配设备。
2.设备接上天线,正常10W电源供电,NET LED 500ms或者1000ms闪烁一次,表示网络正常。
2.2 配置参数
2.2.1 获取测试服务器地址和端口
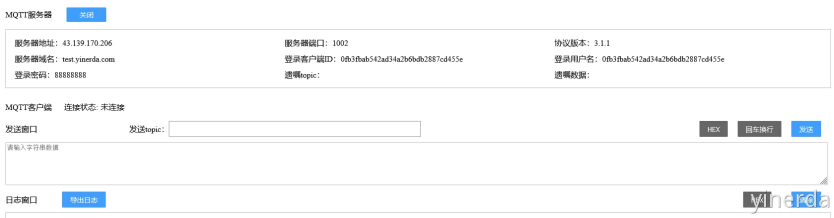
打开DTU测试平台:http://test.yinerda.com,选择“MQTT测试工具”,点击“打开“,可以获取到MQTT测试IP地址/域名 和端口号,登录客户端ID,登录用户名,登录密码。 IP地址或者域名就是TCP的服务器地址,任选其一。
注意:浏览器工具只是用来测试和验证设备使用。10分钟没有任何交互会自动关闭服务器,如果发现连接不上了,重新刷新浏览器,重新打开,获取新资源测试。
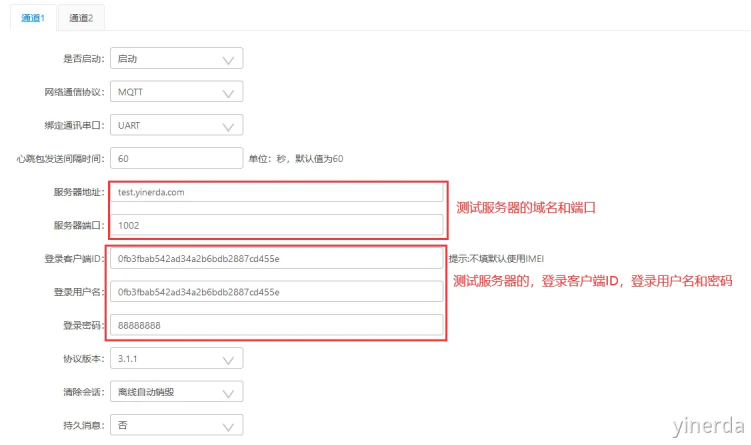
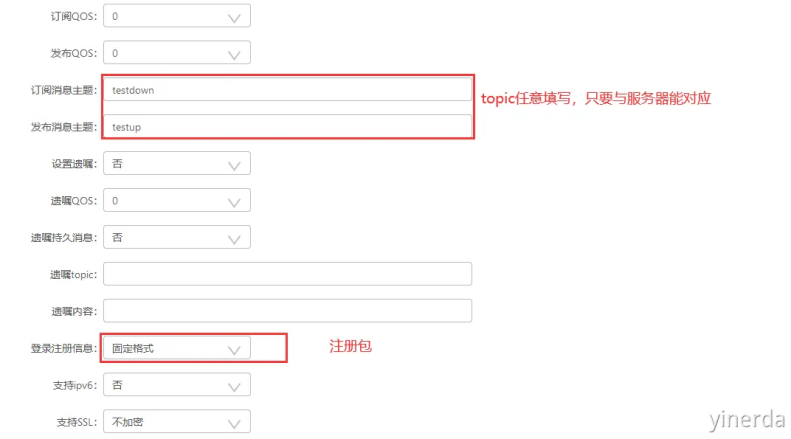
2.2.2 配置参数
在“网络通道参数”界面配置MQTT协议的参数。填写参数的时候,注意,不要填写错了,不要有空格。
2.2.3 更新参数
配置完参数后,点击保存参数,断电重启设备,等待设备更新参数。
如果你只有一台设备,可以在分组里面,观察未更新设备数量,如果是0表示更新。

如果有多台设备,可以在设备列表里面查看,当“分组参数版本” 等于“设备参数版本”,表示参数更新了。

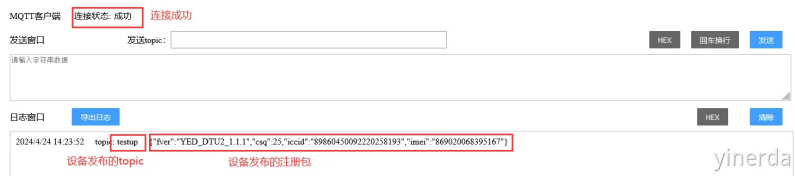
2.2.4 观察服务器连接情况
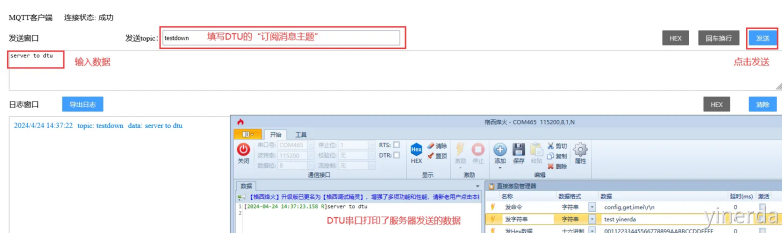
2.2.5 服务器发送数据到串口
打开格西烽火,串口工具连接模块。在发送串口输入数据后,点击发送,数据就会透传到设备串口。如果测试的时候发现没有传送成功。检查一下网络通道参数里面绑定的串口是否正确,或者检查一下测试服务器是否过期,重新刷新浏览器,重新配置参数。
2.2.6 串口透传数据到服务器
串口数据一般是字符串和HEX 2种,在测试服务器上面可以点击HEX模式看原始数据。
从测试数据来看,MQTT本身是可以传如何数据的包括字符串和HEX数据。

3.匹配设备
3.1使用电脑串口与电能表通信
3.1.1 接线
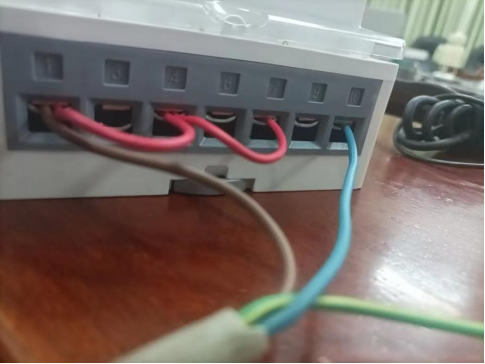
注意三相电能表的,A相、B相、C相口串联(1号口、4号口、7号口串联),将电源线相线接在A相口(1号口)出,零线接在10号口。注意接口要夹着铜丝,不能夹着胶皮,会导致电路不通。这里串联A相、B相、C相的线没有太大要求,只传输电压,没有负载,普通的铜丝线就行。
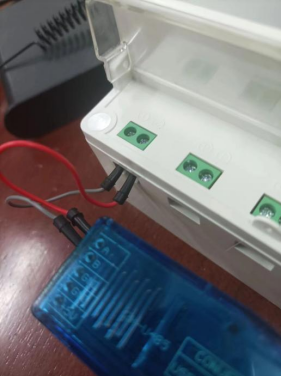
使用杜邦线,将485接口的正负极相连,A端连A端,B端连B端,这里电表的1号口为B端,2号口为A端。
再将485转USB插入电脑USB接口中。

在串口助手中选择好对应的配置,这个电能表的默认波特率是9600,校验位为偶校验。设置好就能打开串口了。
3.1.2 电表指令
我们要采集电表里的数据,就需要先发送对应的命令给电表,之后它就会给我们返回数据了。
举例,我们发送一条指令:01 04 00 00 00 01 31 CA
01:电表的地址,因为485通信可以一次连很多个从机,需要对哪个从机通信,就写其对应的地址
04:操作指令码,03和04是读操作,10为写操作。
00 00:要进行读取的寄存器地址,在前面提供的下载链接中有该电表的通讯地址表格,每个地址对应的寄存器储存着各自的内容,比如地址00 00寄存器存储着A相的电压,数据格式为int整型,数据长度为1字即2个字节,单位是0.1V,即得到的数据要除以10才能得到真正的电压。
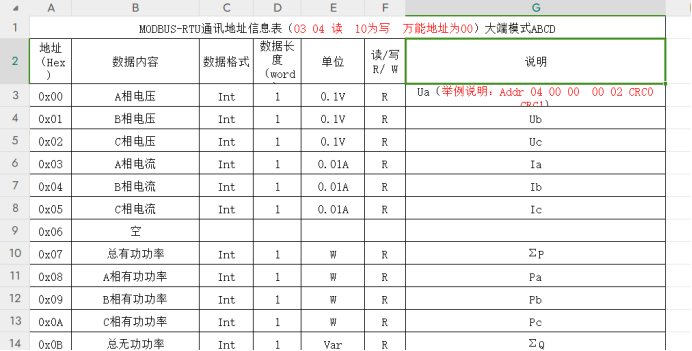
00 01:要读取1个字,即2个字节,一般数据长度都是1个字,这两位一般填00 01就行
31 CA:CRC校验码,需要根据前面6个字节的内容来决定,比如这段指令是
01 04 00 00 00 01,我们用CRC校验码计算工具就能够得到这段数据对应的校验码
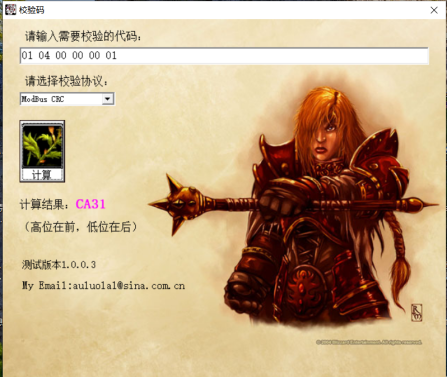
注意高位在前,低位在后,所以我们发送出去的完整指令就是:
01 04 00 00 00 01 31 CA
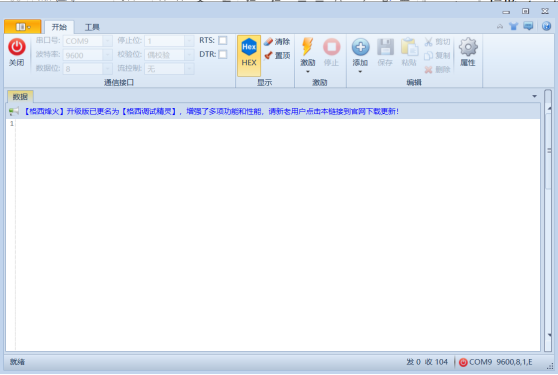
3.1.3 串口助手
这个串口助手的使用方式比较特别,不是直接输入然后就能发送的。
先点击上方指令栏的添加—>添加直接激励
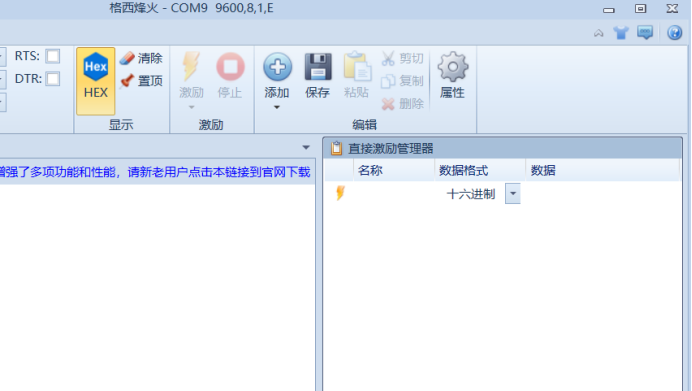
右方就会出现直接激励管理器,激励其实就是发送,我们在数据这一栏填写我们要发送的指令,然后点击激励就能够发送了,注意发送的数据格式要为16进制,同时我们把显示的HEX也打开,这样我们收到的数据也就会是以16进制的格式显示了。
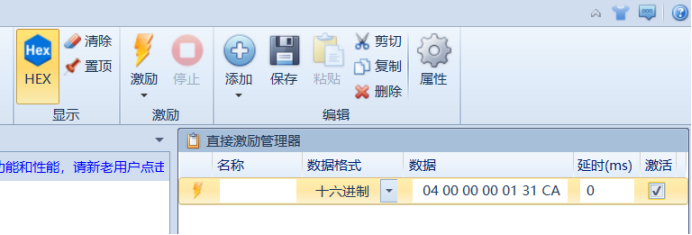
注意勾选激活和打开串口,这样上方的激励才能够使用。
现在我们可以尝试使用串口发送这条指令给电表,看它会给我们回复怎么样的数据。

我们可以看到在我们发送读取A相电压的指令之后,电表发回来了一串数据:
01 04 02 09 58 BE 9A
01:同样代表的是电表的地址
04:表示这是一次读操作的指令回复
02:代表接下来的两个字节是我们要采集的A相的电压的数据
09 58:采集到的数据
BE 9A:校验码
我们把16进制数0958转换成十进制数就是:2392
再除以10就是A相的电压:239.2V
3.2使用YED D780L2-Y与电能表通信
接下来我们要做的就是让这个DTU(YED D780L2-Y)能够自动地与这个电表进行通信,并且将得到的数据发到MQTT服务器上来。
我们先通过自动轮询这个比较简单的方式来实现
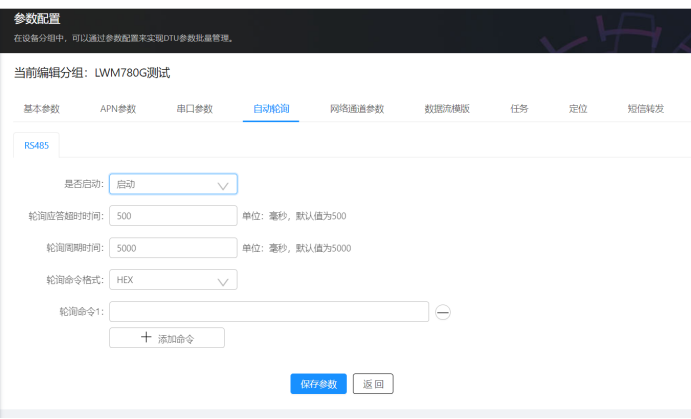
这个自动轮询就是过一段时间就从DTU的串口中发送出一条数据,我们可以通过改写这里的轮询命令1来控制这条数据,我们要写的就是前面用电脑直接发送给电表的读A相电压操作的指令。
DTU每次发送之后,电表都会把采集到的数据发回给DTU,DTU也会自动将自己串口收到的数据传给MQTT。
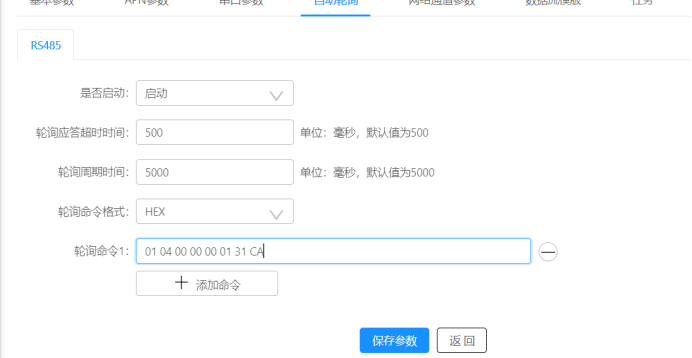
修改好之后我们只需要重新上电等待DTU自动连接到MQTT服务器就好了。
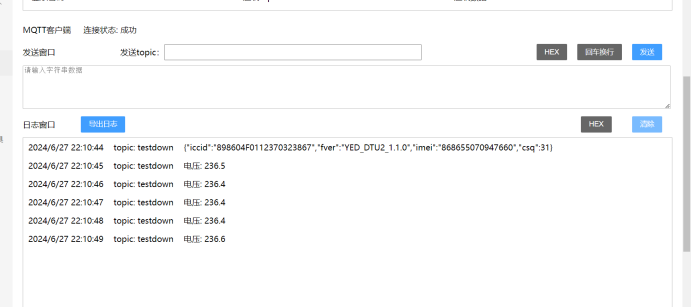
将日志窗口改为HEX显示,我们就能够看到由电表采集后,用串口发送给DTU,然后DTU再通过4G发送到MQTT服务器上的A相电压数据了。
4.任务采集
只是单纯的显示出电表发送出来的数据显然还不够,最好能够在DTU上把电压值直接计算好,然后发过来在MQTT服务器上显示。
4.1计算任务
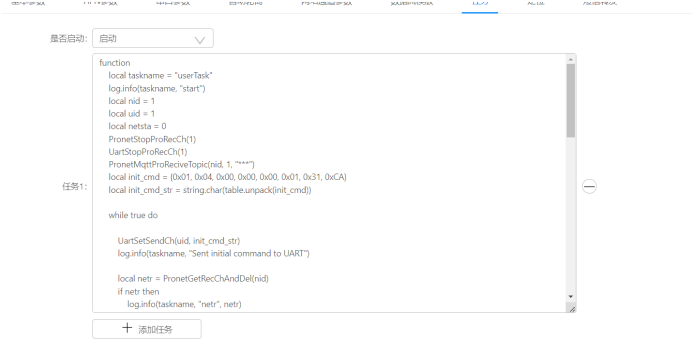
我们要是想让数据直接在DTU上计算好,然后再发过来,单单靠自动轮询就不够用了,我们还需要用到另一个功能,就是任务。
我们可以在这里写lua的函数,能够直接在DTU上运行这段代码。
例如运行代码:
function
local taskname = “userTask”
log.info(taskname, “start”)
local nid = 1
local uid = 1
local netsta = 0
PronetStopProRecCh(1)
UartStopProRecCh(1)
PronetMqttProReciveTopic(nid, 1, “***”)
local init_cmd = {0x01, 0x04, 0x00, 0x00, 0x00, 0x01, 0x31, 0xCA}
local init_cmd_str = string.char(table.unpack(init_cmd))
while true do
UartSetSendCh(uid, init_cmd_str)
log.info(taskname, “Sent initial command to UART”)
local netr = PronetGetRecChAndDel(nid)
if netr then
log.info(taskname, “netr”, netr)
UartSetSendCh(uid, netr)
end
local uartr = UartGetRecChAndDel(uid)
if uartr then
log.info(taskname, “uartr”, uartr)
local netsta = PronetGetNetSta(nid)
log.info(taskname, “netsta”, netsta)
if netsta == 1 then
local uartr_bytes = {uartr:byte(1, -1)} — 将接收到的数据转换为字节表
if uartr_bytes[1] == 0x01 and uartr_bytes[2] == 0x04 then
local hex_bytes = {uartr_bytes[4], uartr_bytes[5]}
local function hex_to_int(bytes)
local high_byte, low_byte = bytes[1], bytes[2]
local int_val = high_byte * 256 + low_byte
return int_val
end
local int_val = hex_to_int(hex_bytes)
local float_val = int_val / 10
local message = string.format(“电压: %.1f”, float_val)
log.info(taskname, message)
PronetSetSendCh(nid, message)
elseif uartr:sub(1, 3) == “aaa” then
PronetSetSendCh(nid, uartr)
elseif uartr:sub(1, 4) == “bbb2” then
local bbb2 = {2, uartr}
PronetSetSendCh(nid, bbb2)
elseif uartr:sub(1, 4) == “bbb3” then
local bbb3 = {3, uartr}
PronetSetSendCh(nid, bbb3)
elseif uartr:sub(1, 3) == “ccc” then
local ccc = {“user”, uartr}
PronetSetSendCh(nid, ccc)
else
PronetSetSendCh(nid, uartr)
end
end
end
sys.wait(1000)
end
end
我们就能够直接在MQTT服务器上得到A相的电压值了
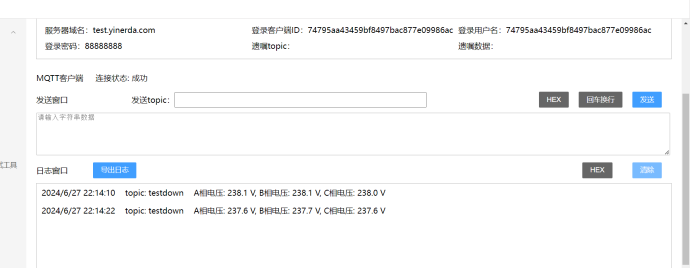
我们也可以通过编写代码,来同时获取A相B相C相的各自的电压值。
function
sys.wait(5000)
local taskname = “userTask”
log.info(taskname, “start”)
local nid = 1
local uid = 1
PronetStopProRecCh(1)
UartStopProRecCh(1)
PronetMqttProReciveTopic(nid, 1, “***”)
local init_AVoltagecmd = {0x01, 0x04, 0x00, 0x00, 0x00, 0x01, 0x31, 0xCA}
local init_BVoltagecmd = {0x01, 0x04, 0x00, 0x01, 0x00, 0x01, 0x60, 0x0A}
local init_CVoltagecmd = {0x01, 0x04, 0x00, 0x02, 0x00, 0x01, 0x90, 0x0A}
local init_cmd_AVoltage_str = string.char(table.unpack(init_AVoltagecmd))
local init_cmd_BVoltage_str = string.char(table.unpack(init_BVoltagecmd))
local init_cmd_CVoltage_str = string.char(table.unpack(init_CVoltagecmd))
local function hex_to_int(bytes)
local high_byte, low_byte = bytes[1], bytes[2]
local int_val = high_byte * 256 + low_byte
return int_val
end
while true do
local voltages = {}
— 发送A相电压命令
UartSetSendCh(uid, init_cmd_AVoltage_str)
log.info(taskname, “Sent A Voltage command to UART”)
sys.wait(500)
local uartr = UartGetRecChAndDel(uid)
if uartr then
log.info(taskname, “uartr”, uartr)
local uartr_bytes = {uartr:byte(1, -1)}
if #uartr_bytes >= 7 and uartr_bytes[1] == 0x01 and uartr_bytes[2] == 0x04 then
local hex_bytes = {uartr_bytes[4], uartr_bytes[5]}
local int_val = hex_to_int(hex_bytes)
local float_val = int_val / 10
voltages[“A”] = float_val
end
end
— 发送B相电压命令
UartSetSendCh(uid, init_cmd_BVoltage_str)
log.info(taskname, “Sent B Voltage command to UART”)
sys.wait(500)
uartr = UartGetRecChAndDel(uid)
if uartr then
log.info(taskname, “uartr”, uartr)
local uartr_bytes = {uartr:byte(1, -1)}
if #uartr_bytes >= 7 and uartr_bytes[1] == 0x01 and uartr_bytes[2] == 0x04 then
local hex_bytes = {uartr_bytes[4], uartr_bytes[5]}
local int_val = hex_to_int(hex_bytes)
local float_val = int_val / 10
voltages[“B”] = float_val
end
end
— 发送C相电压命令
UartSetSendCh(uid, init_cmd_CVoltage_str)
log.info(taskname, “Sent C Voltage command to UART”)
sys.wait(500)
uartr = UartGetRecChAndDel(uid)
if uartr then
log.info(taskname, “uartr”, uartr)
local uartr_bytes = {uartr:byte(1, -1)}
if #uartr_bytes >= 7 and uartr_bytes[1] == 0x01 and uartr_bytes[2] == 0x04 then
local hex_bytes = {uartr_bytes[4], uartr_bytes[5]}
local int_val = hex_to_int(hex_bytes)
local float_val = int_val / 10
voltages[“C”] = float_val
end
end
— 如果收到了所有的电压数据,则发送到MQTT
if voltages[“A”] and voltages[“B”] and voltages[“C”] then
local message = string.format(“A相电压: %.1f V, B相电压: %.1f V, C相电压: %.1f V”,
voltages[“A”], voltages[“B”], voltages[“C”])
log.info(taskname, message)
PronetSetSendCh(nid, message)
end
sys.wait(10000) — 每10秒发送一次初始命令和处理接收到的数据
end
End
4.2启动任务
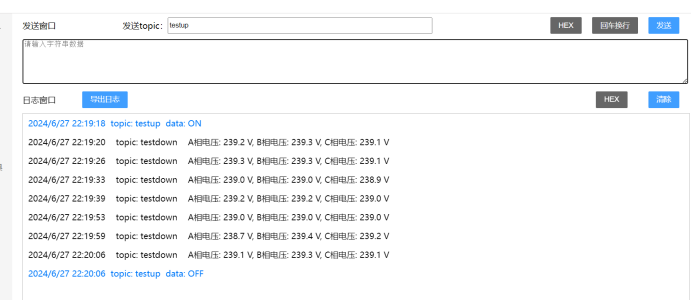
我们在正常的使用中,一般也不会需要时时刻刻都显示这些电压信息,这样大部分时间没有作用还会浪费资源,用以下的代码我们就可以做到,在MQTT服务器发送指令“ON”之后,开始以每5s一次的频率来采集电压数据,发送指令“OFF”之后就停止采集。
function
local taskname = “userTask”
log.info(taskname, “start”)
local nid = 1
local uid = 1
PronetStopProRecCh(1)
UartStopProRecCh(1)
PronetMqttProReciveTopic(nid, 1, “,”)
local collecting = false — 采集状态标志
local function hex_to_int(bytes)
local high_byte, low_byte = bytes[1], bytes[2]
local int_val = high_byte * 256 + low_byte
return int_val
end
local function send_voltage_command(cmd_str)
UartSetSendCh(uid, cmd_str)
end
local function get_voltage(cmd_str, phase)
send_voltage_command(cmd_str)
log.info(taskname, “Sent ” .. phase .. ” Voltage command to UART”)
sys.wait(500)
local uartr = UartGetRecChAndDel(uid)
if uartr then
log.info(taskname, “uartr”, uartr)
local uartr_bytes = {uartr:byte(1, -1)}
if #uartr_bytes >= 7 and uartr_bytes[1] == 0x01 and uartr_bytes[2] == 0x04 then
local hex_bytes = {uartr_bytes[4], uartr_bytes[5]}
local int_val = hex_to_int(hex_bytes)
local float_val = int_val / 10
local message = string.format(“%s相电压: %.1f V”, phase, float_val)
log.info(taskname, message)
PronetSetSendCh(nid, message)
end
end
end
local function fetch_voltages()
local init_AVoltagecmd = {0x01, 0x04, 0x00, 0x00, 0x00, 0x01, 0x31, 0xCA}
local init_BVoltagecmd = {0x01, 0x04, 0x00, 0x01, 0x00, 0x01, 0x60, 0x0A}
local init_CVoltagecmd = {0x01, 0x04, 0x00, 0x02, 0x00, 0x01, 0x90, 0x0A}
local init_cmd_AVoltage_str = string.char(table.unpack(init_AVoltagecmd))
local init_cmd_BVoltage_str = string.char(table.unpack(init_BVoltagecmd))
local init_cmd_CVoltage_str = string.char(table.unpack(init_CVoltagecmd))
local voltages = {}
— 发送A相电压命令
send_voltage_command(init_cmd_AVoltage_str)
log.info(taskname, “Sent A Voltage command to UART”)
sys.wait(500)
local uartr = UartGetRecChAndDel(uid)
if uartr then
log.info(taskname, “uartr”, uartr)
local uartr_bytes = {uartr:byte(1, -1)}
if #uartr_bytes >= 7 and uartr_bytes[1] == 0x01 and uartr_bytes[2] == 0x04 then
local hex_bytes = {uartr_bytes[4], uartr_bytes[5]}
local int_val = hex_to_int(hex_bytes)
local float_val = int_val / 10
voltages[“A”] = float_val
end
end
— 发送B相电压命令
send_voltage_command(init_cmd_BVoltage_str)
log.info(taskname, “Sent B Voltage command to UART”)
sys.wait(500)
uartr = UartGetRecChAndDel(uid)
if uartr then
log.info(taskname, “uartr”, uartr)
local uartr_bytes = {uartr:byte(1, -1)}
if #uartr_bytes >= 7 and uartr_bytes[1] == 0x01 and uartr_bytes[2] == 0x04 then
local hex_bytes = {uartr_bytes[4], uartr_bytes[5]}
local int_val = hex_to_int(hex_bytes)
local float_val = int_val / 10
voltages[“B”] = float_val
end
end
— 发送C相电压命令
send_voltage_command(init_cmd_CVoltage_str)
log.info(taskname, “Sent C Voltage command to UART”)
sys.wait(500)
uartr = UartGetRecChAndDel(uid)
if uartr then
log.info(taskname, “uartr”, uartr)
local uartr_bytes = {uartr:byte(1, -1)}
if #uartr_bytes >= 7 and uartr_bytes[1] == 0x01 and uartr_bytes[2] == 0x04 then
local hex_bytes = {uartr_bytes[4], uartr_bytes[5]}
local int_val = hex_to_int(hex_bytes)
local float_val = int_val / 10
voltages[“C”] = float_val
end
end
— 如果收到了所有的电压数据,则发送到MQTT
if voltages[“A”] and voltages[“B”] and voltages[“C”] then
local message = string.format(“A相电压: %.1f V, B相电压: %.1f V, C相电压: %.1f V”,
voltages[“A”], voltages[“B”], voltages[“C”])
log.info(taskname, message)
PronetSetSendCh(nid, message)
end
end
while true do
local netr = PronetGetRecChAndDel(nid)
if netr then
log.info(taskname, “netr”, netr)
if netr == “testup,ON” then
collecting = true
log.info(taskname, “Started collecting voltage data”)
UartSetSendCh(uid, “\n”) — 先发送一个换行符
sys.wait(100) — 等待100毫秒
elseif netr == “testup,OFF” then
collecting = false
log.info(taskname, “Stopped collecting voltage data”)
elseif netr == “testup,GET A VOLTAGE” then
UartSetSendCh(uid, “\n”) — 先发送一个换行符
sys.wait(100) — 等待100毫秒
local init_AVoltagecmd = {0x01, 0x04, 0x00, 0x00, 0x00, 0x01, 0x31, 0xCA}
local init_cmd_AVoltage_str = string.char(table.unpack(init_AVoltagecmd))
get_voltage(init_cmd_AVoltage_str, “A”)
elseif netr == “testup,GET B VOLTAGE” then
UartSetSendCh(uid, “\n”) — 先发送一个换行符
sys.wait(100) — 等待100毫秒
local init_BVoltagecmd = {0x01, 0x04, 0x00, 0x01, 0x00, 0x01, 0x60, 0x0A}
local init_cmd_BVoltage_str = string.char(table.unpack(init_BVoltagecmd))
get_voltage(init_cmd_BVoltage_str, “B”)
elseif netr == “testup,GET C VOLTAGE” then
UartSetSendCh(uid, “\n”) — 先发送一个换行符
sys.wait(100) — 等待100毫秒
local init_CVoltagecmd = {0x01, 0x04, 0x00, 0x02, 0x00, 0x01, 0x90, 0x0A}
local init_cmd_CVoltage_str = string.char(table.unpack(init_CVoltagecmd))
get_voltage(init_cmd_CVoltage_str, “C”)
else
UartSetSendCh(uid, netr)
end
end
local uartr = UartGetRecChAndDel(uid)
if uartr then
log.info(taskname, “uartr”, uartr)
local netsta = PronetGetNetSta(nid)
log.info(taskname, “netsta”, netsta)
if netsta == 1 then
local a1, a2 = string.find(uartr, “,”)
if a1 and a1 ~= 1 and a2 then
local ccc = {}
ccc[1] = string.sub(uartr, 1, a1 – 1)
ccc[2] = string.sub(uartr, a1 + 1, -1)
log.info(taskname, “send data topic is “, ccc[1], “data is “, ccc[2])
PronetSetSendCh(nid, ccc)
end
end
end
if collecting then
fetch_voltages()
sys.wait(5000) — 每5秒采集一次电压数据
else
sys.wait(100) — 每100毫秒检查一次是否需要采集
end
end
end
同时,如果我们想要单独采集A相、B相或C相的电压,也有对应的指令可以操作:

5.远程调试
我们前面做的工作都是要跟DTU有线连接着进行调试的,我们的应用场景基本上都在户外,想要带着电脑到现场进行调试不太现实,所以要实现接下来的远程调试。这里利用的是这个DTU具有两个网络通道的性质,通道1用作发送命令,通道2用作调试。由通道1发送给DTU的命令,需要转发给通道2,由DTU从串口发送到仪表的指令码需要转发给通道2,由仪表返回给DTU的16进制格式的数据需要转发给通道2,DTU将16进制格式数据解析好之后发回给通道1的数据也要转发给通道2。使得所有DTU接收到发送出的消息都能在通道2上看到,在出现问题时,我们就能够通过观察通道2上的消息来判断那个部分出了问题。
为了方便调试,我们选择通道2为TCP通信协议。TCP只需要填写好IP地址和端口号就行,比较方便。
以下代码作为参考:
function
local taskname = “userTask”
log.info(taskname, “start”)
local nid1, nid2 = 1, 2
local s={}
PronetStopProRecCh(nid1)
PronetMqttProReciveTopic(nid1, 1, “/”)
local power_off_command = string.char(0x01, 0x10, 0x00, 0x10, 0x00, 0x01, 0x02, 0xAA, 0xAA, 0x5A, 0x1F)
local power_on_command = string.char(0x01, 0x10, 0x00, 0x10, 0x00, 0x01, 0x02, 0x55, 0x55, 0x5B, 0xAF)
local function debug_info(message)
PronetSetSendCh(nid2, message)
return 1
end
local function send_command_to_channel(command)
PronetSetSendCh(nid2, command)
sys.wait(500) — 等待通道2响应
return PronetGetRecChAndDel(nid2)
end
local function extract_request_id(topic)
local request_id = topic:match(“v1/devices/me/rpc/request/(%d+)”)
return request_id
end
local function handle_power_command(command, success_message, failure_message)
local response = send_command_to_channel(command)
if response then
local response_bytes = {response:byte(1, -1)}
if #response_bytes >= 2 and response_bytes[1] == 0x01 then
if response_bytes[2] == 0x00 then
return success_message
elseif response_bytes[2] == 0x01 then
return failure_message
else
return “未知响应“
end
else
return “无效响应“
end
else
return “无响应“
end
end
while true do
local mqttRec = PronetGetRecChAndDel(nid1)
if mqttRec then
log.info(taskname, “mqttRec data”, mqttRec)
debug_info(mqttRec)
log.info(taskname, “Sent raw data to channel 2”, mqttRec)
local request_id = extract_request_id(mqttRec)
local command = nil
local response_message = “”
if mqttRec:find(‘”method”:”setState”,”params”:false’) then
command = power_off_command
response_message = handle_power_command(command, “关闭成功“, “关闭失败“)
debug_info(“发送关闭命令“)
elseif mqttRec:find(‘”method”:”setState”,”params”:true’) then
command = power_on_command
response_message = handle_power_command(command, “启动成功“, “启动失败“)
debug_info(“发送打开命令“)
end
if request_id and response_message ~= “” then
local response_topic = “v1/devices/me/rpc/response/” ..request_id
–v1/devices/me/rpc/response/91
s[1] = response_topic
s[2] = response_message
PronetSetSendCh(nid1,s)
debug_info(response_topic)
log.info(taskname, “Sent response”, response_message, “to topic”, response_topic)
end
end
— 每100毫秒检查一次
sys.wait(100)
end
end